创建可脚本化的瓦片
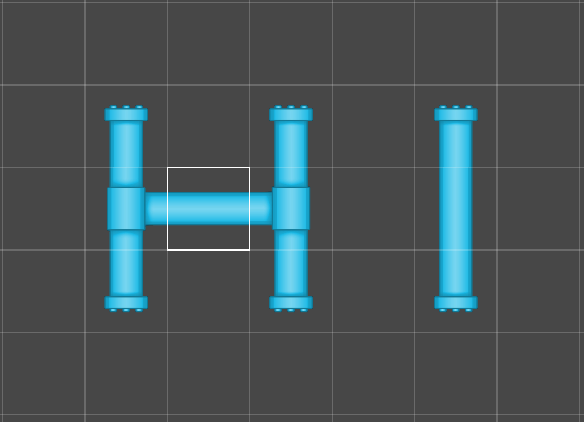
此页面上的代码示例演示了如何创建自己的可脚本化瓦片,以及如何在项目中使用它。PipelineExampleTile 可脚本化瓦片是一个瓦片示例,可用于在瓦片地图上布局线性片段,这些片段在您绘制时会自动连接起来。这对于设计旨在作为道路或管道的瓦片非常有用。
为您的项目创建可脚本化的瓦片

先决条件
在继续执行此任务之前,您必须安装2D 瓦片地图编辑器包。此包是2D 功能集的一部分,如果您在创建新项目时选择其中一个2D 模板,则会自动安装它。您还可以通过Unity 的包管理器手动安装此包。
使用脚本创建可脚本化的瓦片
要创建PipelineExampleTile 可脚本化的瓦片并使其成为 UnityEditor 的资源菜单中可用的选项
- 通过转到资源 > 创建 > MonoBehaviour 脚本来创建一个空白的 MonoBehaviour 脚本。
- 将文件命名为
PipelineExampleTile.cs。 - 在文本编辑器中打开文件。
- 将现有代码替换为以下代码,然后保存文件
using System;

#if UNITY_EDITOR
using UnityEditor;
#endif


namespace UnityEngine.Tilemaps
{
   /// <summary>
   /// Pipeline Tiles are tiles which take into consideration its orthogonal neighboring tiles and displays a sprite depending on whether the neighboring tile is the same tile.
   /// </summary>
   [Serializable]
   public class PipelineExampleTile : TileBase
   {
       /// <summary>
       /// The Sprites used for defining the Pipeline.
       /// </summary>
       [SerializeField]
       public Sprite[] m_Sprites;


       /// <summary>
       /// This method is called when the tile is refreshed. The PipelineExampleTile will refresh all neighboring tiles to update their rendering data if they are the same tile.
       /// </summary>
       /// <param name="position">Position of the tile on the Tilemap.</param>
       /// <param name="tilemap">The Tilemap the tile is present on.</param>
       public override void RefreshTile(Vector3Int position, ITilemap tilemap)
       {
           for (int yd = -1; yd <= 1; yd++)
               for (int xd = -1; xd <= 1; xd++)
               {
                   Vector3Int pos = new Vector3Int(position.x + xd, position.y + yd, position.z);
                   if (TileValue(tilemap, pos))
                       tilemap.RefreshTile(pos);
               }
       }


       /// <summary>
       /// Retrieves any tile rendering data from the scripted tile.
       /// </summary>
       /// <param name="position">Position of the tile on the Tilemap.</param>
       /// <param name="tilemap">The Tilemap the tile is present on.</param>
       /// <param name="tileData">Data to render the tile.</param>
       public override void GetTileData(Vector3Int position, ITilemap tilemap, ref TileData tileData)
       {
           UpdateTile(position, tilemap, ref tileData);
       }


       /// <summary>
       /// Checks the orthogonal neighbouring positions of the tile and generates a mask based on whether the neighboring tiles are the same. The mask will determine the according Sprite and transform to be rendered at the given position. The Sprite and Transform is then filled into TileData for the Tilemap to use. The Flags lock the color and transform to the data provided by the tile. The ColliderType is set to the shape of the Sprite used.
       /// </summary>
       private void UpdateTile(Vector3Int position, ITilemap tilemap, ref TileData tileData)
       {
           tileData.transform = Matrix4x4.identity;
           tileData.color = Color.white;


           int mask = TileValue(tilemap, position + new Vector3Int(0, 1, 0)) ? 1 : 0;
           mask += TileValue(tilemap, position + new Vector3Int(1, 0, 0)) ? 2 : 0;
           mask += TileValue(tilemap, position + new Vector3Int(0, -1, 0)) ? 4 : 0;
           mask += TileValue(tilemap, position + new Vector3Int(-1, 0, 0)) ? 8 : 0;


           int index = GetIndex((byte)mask);
           if (index >= 0 && index < m_Sprites.Length && TileValue(tilemap, position))
           {
               tileData.sprite = m_Sprites[index];
               tileData.transform = GetTransform((byte)mask);
               tileData.flags = TileFlags.LockTransform | TileFlags.LockColor;
               tileData.colliderType = Tile.ColliderType.Sprite;
           }
       }


       /// <summary>
       /// Determines if the tile at the given position is the same tile as this.
       /// </summary>
       private bool TileValue(ITilemap tileMap, Vector3Int position)
       {
           TileBase tile = tileMap.GetTile(position);
           return (tile != null && tile == this);
       }


       /// <summary>
       /// Determines the index of the Sprite to be used based on the neighbour mask.
       /// </summary>
       private int GetIndex(byte mask)
       {
           switch (mask)
           {
               case 0: return 0;
               case 3:
               case 6:
               case 9:
               case 12: return 1;
               case 1:
               case 2:
               case 4:
               case 5:
               case 10:
               case 8: return 2;
               case 7:
               case 11:
               case 13:
               case 14: return 3;
               case 15: return 4;
           }
           return -1;
       }


       /// <summary>
       /// Determines the Transform to be used based on the neighbour mask.
       /// </summary>
       private Matrix4x4 GetTransform(byte mask)
       {
           switch (mask)
           {
               case 9:
               case 10:
               case 7:
               case 2:
               case 8:
                   return Matrix4x4.TRS(Vector3.zero, Quaternion.Euler(0f, 0f, -90f), Vector3.one);
               case 3:
               case 14:
                   return Matrix4x4.TRS(Vector3.zero, Quaternion.Euler(0f, 0f, -180f), Vector3.one);
               case 6:
               case 13:
                   return Matrix4x4.TRS(Vector3.zero, Quaternion.Euler(0f, 0f, -270f), Vector3.one);
           }
           return Matrix4x4.identity;
       }
   }

#if UNITY_EDITOR
   /// <summary>
   /// Custom Editor for a PipelineExampleTile. This is shown in the Inspector window when a PipelineExampleTile asset is selected.
   /// </summary>
   [CustomEditor(typeof(PipelineExampleTile))]
   public class PipelineExampleTileEditor : Editor
   {
       private PipelineExampleTile tile { get { return (target as PipelineExampleTile); } }


       public void OnEnable()
       {
           if (tile.m_Sprites == null || tile.m_Sprites.Length != 5)
               tile.m_Sprites = new Sprite[5];
       }


       /// <summary>
       /// Draws an Inspector for the PipelineExampleTile.
       /// </summary>
       public override void OnInspectorGUI()
       {
           EditorGUILayout.LabelField("Place sprites shown based on the number of tiles bordering it.");
           EditorGUILayout.Space();

           EditorGUI.BeginChangeCheck();
           tile.m_Sprites[0] = (Sprite) EditorGUILayout.ObjectField("None", tile.m_Sprites[0], typeof(Sprite), false, null);
           tile.m_Sprites[2] = (Sprite) EditorGUILayout.ObjectField("One", tile.m_Sprites[2], typeof(Sprite), false, null);
           tile.m_Sprites[1] = (Sprite) EditorGUILayout.ObjectField("Two", tile.m_Sprites[1], typeof(Sprite), false, null);
           tile.m_Sprites[3] = (Sprite) EditorGUILayout.ObjectField("Three", tile.m_Sprites[3], typeof(Sprite), false, null);
           tile.m_Sprites[4] = (Sprite) EditorGUILayout.ObjectField("Four", tile.m_Sprites[4], typeof(Sprite), false, null);
           if (EditorGUI.EndChangeCheck())
               EditorUtility.SetDirty(tile);
       }


       /// <summary>
       /// The following is a helper that adds a menu item to create a PipelineExampleTile Asset in the project.
       /// </summary>
       [MenuItem("Assets/Create/PipelineExampleTile")]
       public static void CreatePipelineExampleTile()
       {
           string path = EditorUtility.SaveFilePanelInProject("Save Pipeline Example Tile", "New Pipeline Example Tile", "Asset", "Save Pipeline Example Tile", "Assets");
           if (path == "")
               return;
           AssetDatabase.CreateAsset(ScriptableObject.CreateInstance<PipelineExampleTile>(), path);
        }
   }
#endif
}
现在,无论您需要在何处使用可脚本化的瓦片,都可以使用ScriptableObject.CreateInstance<YOUR_TILE_CLASS>()创建新类的实例。您还可以通过调用AssetDatabase.CreateAsset()将此新实例转换为编辑器中的资源,以便重复使用它。
使用可脚本化的瓦片进行绘制
在导入或保存PipelineExampleTile.cs脚本到您的项目后,您将能够创建PipelineExampleTile瓦片资源。
要使用PipelineExampleTile瓦片进行绘制
创建一个PipelineExampleTile瓦片资源(菜单:资源 > 创建 > PipelineExampleTile)。
选择创建的瓦片资源并转到其检查器一个 Unity 窗口,显示有关当前选定的游戏对象、资源或项目设置的信息,允许您检查和编辑值。 更多信息
参见 词汇表窗口。-
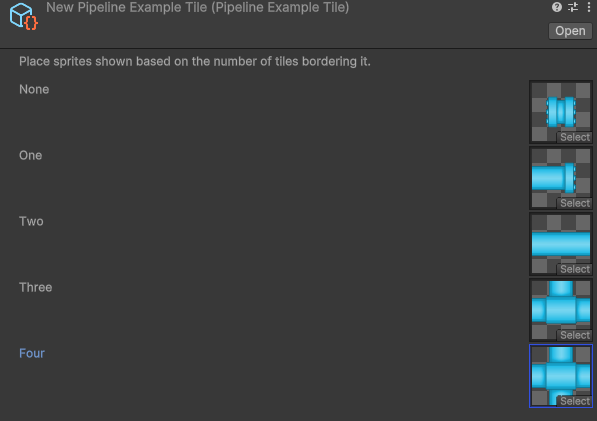
根据与其相邻的瓦片数量,使用精灵填充
PipelineExampleTile。例如,一个的精灵2D 图形对象。如果您习惯于使用 3D,则精灵本质上只是标准纹理,但有一些特殊的技术用于组合和管理精灵纹理,以便在开发过程中提高效率和便利性。 更多信息
参见 词汇表只有一个开口,而三个的精灵沿着精灵的边缘有三个开口。注意:当使用您自己的精灵时,建议匹配以下示例中显示的位置和方向
保存您的项目以保存对瓦片所做的更改。
通过将瓦片资源从项目窗口拖放到瓦片调色板编辑器窗口中的瓦片调色板,将其添加到瓦片调色板中。
使用绘制工具和可脚本化的瓦片在您的瓦片地图一个游戏对象,允许您使用瓦片和网格覆盖快速创建 2D 关卡。 更多信息
参见 词汇表上进行绘制。