public static int depth;
描述
当前执行 GUI 行为的排序深度。
当你同时运行不同的脚本时,应设置此项来确定排序。使用较低深度值的 GUI 元素将显示在较高值元素的顶部(即,你可以将深度视为与摄像机的“距离”)。
注意:要查看此示例的运行情况,你需要创建 2 个脚本。请记住使用与类名相同的名称来命名脚本,否则无法正常运行。
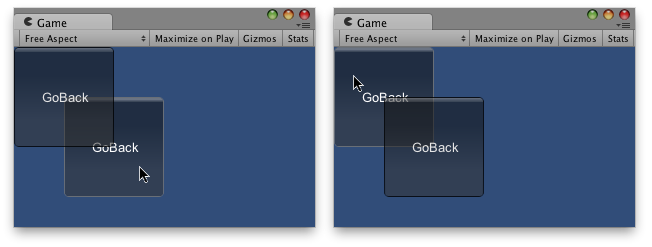
一个按钮置于另一个按钮之后。
using UnityEngine;
using System.Collections;

// Makes this button go back in depth

public class Example1 : MonoBehaviour
{
    public int guiDepth = 0;
    public Example2 example2;

    private float buttonX, buttonY;

    void Start()
    {
        buttonX = (Screen.width / 2) - 100;
        buttonY = (Screen.height / 2) - 100;
    }

    void OnGUI()
    {
        GUI.depth = guiDepth;
        GUI.color = Color.yellow;

        GUIStyle size = new GUIStyle("button");
        size.fontSize = 16;

        if (GUI.RepeatButton(new Rect(buttonX, buttonY, 200, 100), "Go Backwards", size))
        {
            guiDepth = 1;
            example2.guiDepth = 0;
        }
    }
}
然后将此其他示例复制到另一个脚本
using UnityEngine;
using System.Collections;

// Makes this button go back in depth

public class Example2 : MonoBehaviour
{
    public int guiDepth = 1;
    public Example1 example1;

    private float buttonX, buttonY;

    void Start()
    {
        buttonX = (Screen.width / 2)  - 50;
        buttonY = (Screen.height / 2) - 50;
    }

    void OnGUI()
    {
        GUI.depth = guiDepth;
        GUI.color = Color.green;

        GUIStyle size = new GUIStyle("button");
        size.fontSize = 16;

        if (GUI.RepeatButton(new Rect(buttonX, buttonY, 200, 100), "Go Backwards", size))
        {
            guiDepth = 1;
            example1.guiDepth = 0;
        }
    }
}