在自定义编辑器窗口中创建拖放式 UI
版本: 2021.3+
拖放是UI(用户界面) 允许用户与您的应用程序进行交互。Unity 目前支持三种 UI 系统。更多信息
参见 术语表设计中的常见功能。您可以使用 UI 工具包在自定义编辑器窗口或由 Unity 构建的应用程序中创建拖放式 UI。此示例演示如何在自定义编辑器窗口中创建拖放式 UI。
示例概述
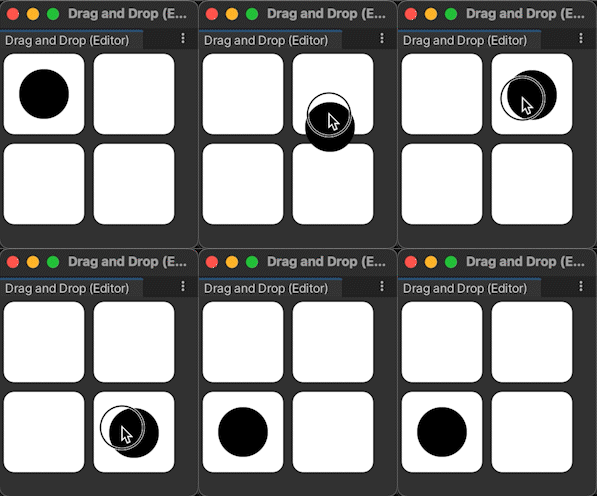
此示例在自定义编辑器窗口中添加了多个插槽和一个对象。您可以将对象拖动到任何插槽中,如下所示

您可以在此 GitHub 存储库中找到此示例创建的完整文件。
先决条件
本指南适用于熟悉 Unity 编辑器、UI 工具包和 C# 脚本的开发人员。在开始之前,请熟悉以下内容
创建自定义编辑器窗口
首先,从菜单中创建一个默认的自定义编辑器窗口。将菜单名称和窗口标题更改为 Drag And Drop,并删除默认标签的代码,以使 UI 更友好。
在 Unity 中使用任何模板创建一个项目。
在
Assets文件夹中右键单击,然后选择创建 > UI 工具包 > 编辑器窗口。在UI 工具包编辑器窗口创建器中,输入
DragAndDropWindow。单击确认。这将自动创建三个文件:
DragAndDropWindow.cs、DragAndDropWindow.uxml和DragAndDropWindow.uss。-
将
DragAndDropWindow.cs的内容替换为以下内容using UnityEditor; using UnityEngine; using UnityEngine.UIElements; using UnityEditor.UIElements; public class DragAndDropWindow : EditorWindow { [MenuItem("Window/UI Toolkit/Drag And Drop")] public static void ShowExample() { DragAndDropWindow wnd = GetWindow<DragAndDropWindow>(); wnd.titleContent = new GUIContent("Drag And Drop"); } public void CreateGUI() { // Each editor window contains a root VisualElement object VisualElement root = rootVisualElement; // Import UXML var visualTree = AssetDatabase.LoadAssetAtPath<VisualTreeAsset>("Assets/Editor/DragAndDropWindow.uxml"); VisualElement labelFromUXML = visualTree.Instantiate(); root.Add(labelFromUXML); // A stylesheet can be added to a VisualElement. // The style will be applied to the VisualElement and all of its children. var styleSheet = AssetDatabase.LoadAssetAtPath<StyleSheet>("Assets/Editor/DragAndDropWindow.uss"); } }
创建插槽和对象
接下来,将 UI 控件添加到您的自定义窗口
- 一个名为
slots,有两个名为slot_row1和slot_row2的子元素。每行应有两个名为slot1和slot2的子元素。 - 一个名为
object,位于与slots相同的级别。object必须在 层次结构中位于slots之后。
将 UI 控件的样式设置为以下内容
- 对于
slot1和slot2,将它们设置为 80px X 80px 的正方形,白色背景色和圆角。将插槽对齐为两行,每行两个插槽。 - 对于
object,将它设置为 50px X 50px 的圆形斑点,黑色背景色。
提示:为了使您的项目更有趣,您可以为对象使用背景图像。您可以在 GitHub 存储库中找到该图像 (Pouch.png)。
-
将
DragAndDropWindow.uxml的内容替换为以下内容<ui:UXML xmlns:ui="UnityEngine.UIElements" xmlns:uie="UnityEditor.UIElements" xsi="http://www.w3.org/2001/XMLSchema-instance" engine="UnityEngine.UIElements" editor="UnityEditor.UIElements" noNamespaceSchemaLocation="../../../UIElementsSchema/UIElements.xsd" editor-extension-mode="False"> <Style src="DragAndDropWindow.uss" /> <ui:VisualElement name="slots"> <ui:VisualElement name="slot_row1" class="slot_row"> <ui:VisualElement name="slot1" class="slot" /> <ui:VisualElement name="slot2" class="slot" /> </ui:VisualElement> <ui:VisualElement name="slot_row2" class="slot_row"> <ui:VisualElement name="slot1" class="slot" /> <ui:VisualElement name="slot2" class="slot" /> </ui:VisualElement> </ui:VisualElement> <ui:VisualElement name="object" class="object" /> </ui:UXML> -
将
DragAndDropWindow.uss的内容替换为以下内容.slot { width: 80px; height: 80px; margin: 5px; background-color: rgb(255, 255, 255); border-top-radius: 10px; border-top-left-radius: 10px; border-bottom-left-radius: 10px; border-top-right-radius: 10px; border-bottom-right-radius: 10px; } .slot_row { flex-direction: row; } .object { width: 50px; height: 50px; position: absolute; left: 20px; top: 20px; border-radius: 30px; background-color: rgb(0, 0, 0); }
定义拖放逻辑
要定义拖放行为,请扩展 PointerManipulator 类并定义逻辑。编写一个构造函数来设置 target 并存储对视觉树根的引用。编写四个方法,作为 PointerDownEvent、PointerMoveEvent、PointerUpEvent 和 PointerCaptureOutEvent 的回调。实施 RegisterCallbacksOnTarget() 和 UnregisterCallbacksFromTarget() 以从 target 注册和注销这四个回调。
在
Editor文件夹中,创建一个名为DragAndDropManipulator.cs的另一个 C# 文件。-
将
DragAndDropManipulator.cs的内容替换为以下内容using System.Collections; using System.Collections.Generic; using UnityEngine; using UnityEngine.UIElements; public class DragAndDropManipulator : PointerManipulator { // Write a constructor to set target and store a reference to the // root of the visual tree. public DragAndDropManipulator(VisualElement target) { this.target = target; root = target.parent; } protected override void RegisterCallbacksOnTarget() { // Register the four callbacks on target. target.RegisterCallback<PointerDownEvent>(PointerDownHandler); target.RegisterCallback<PointerMoveEvent>(PointerMoveHandler); target.RegisterCallback<PointerUpEvent>(PointerUpHandler); target.RegisterCallback<PointerCaptureOutEvent>(PointerCaptureOutHandler); } protected override void UnregisterCallbacksFromTarget() { // Un-register the four callbacks from target. target.UnregisterCallback<PointerDownEvent>(PointerDownHandler); target.UnregisterCallback<PointerMoveEvent>(PointerMoveHandler); target.UnregisterCallback<PointerUpEvent>(PointerUpHandler); target.UnregisterCallback<PointerCaptureOutEvent>(PointerCaptureOutHandler); } private Vector2 targetStartPosition { get; set; } private Vector3 pointerStartPosition { get; set; } private bool enabled { get; set; } private VisualElement root { get; } // This method stores the starting position of target and the pointer, // makes target capture the pointer, and denotes that a drag is now in progress. private void PointerDownHandler(PointerDownEvent evt) { targetStartPosition = target.transform.position; pointerStartPosition = evt.position; target.CapturePointer(evt.pointerId); enabled = true; } // This method checks whether a drag is in progress and whether target has captured the pointer. // If both are true, calculates a new position for target within the bounds of the window. private void PointerMoveHandler(PointerMoveEvent evt) { if (enabled && target.HasPointerCapture(evt.pointerId)) { Vector3 pointerDelta = evt.position - pointerStartPosition; target.transform.position = new Vector2( Mathf.Clamp(targetStartPosition.x + pointerDelta.x, 0, target.panel.visualTree.worldBound.width), Mathf.Clamp(targetStartPosition.y + pointerDelta.y, 0, target.panel.visualTree.worldBound.height)); } } // This method checks whether a drag is in progress and whether target has captured the pointer. // If both are true, makes target release the pointer. private void PointerUpHandler(PointerUpEvent evt) { if (enabled && target.HasPointerCapture(evt.pointerId)) { target.ReleasePointer(evt.pointerId); } } // This method checks whether a drag is in progress. If true, queries the root // of the visual tree to find all slots, decides which slot is the closest one // that overlaps target, and sets the position of target so that it rests on top // of that slot. Sets the position of target back to its original position // if there is no overlapping slot. private void PointerCaptureOutHandler(PointerCaptureOutEvent evt) { if (enabled) { VisualElement slotsContainer = root.Q<VisualElement>("slots"); UQueryBuilder<VisualElement> allSlots = slotsContainer.Query<VisualElement>(className: "slot"); UQueryBuilder<VisualElement> overlappingSlots = allSlots.Where(OverlapsTarget); VisualElement closestOverlappingSlot = FindClosestSlot(overlappingSlots); Vector3 closestPos = Vector3.zero; if (closestOverlappingSlot != null) { closestPos = RootSpaceOfSlot(closestOverlappingSlot); closestPos = new Vector2(closestPos.x - 5, closestPos.y - 5); } target.transform.position = closestOverlappingSlot != null ? closestPos : targetStartPosition; enabled = false; } } private bool OverlapsTarget(VisualElement slot) { return target.worldBound.Overlaps(slot.worldBound); } private VisualElement FindClosestSlot(UQueryBuilder<VisualElement> slots) { List<VisualElement> slotsList = slots.ToList(); float bestDistanceSq = float.MaxValue; VisualElement closest = null; foreach (VisualElement slot in slotsList) { Vector3 displacement = RootSpaceOfSlot(slot) - target.transform.position; float distanceSq = displacement.sqrMagnitude; if (distanceSq < bestDistanceSq) { bestDistanceSq = distanceSq; closest = slot; } } return closest; } private Vector3 RootSpaceOfSlot(VisualElement slot) { Vector2 slotWorldSpace = slot.parent.LocalToWorld(slot.layout.position); return root.WorldToLocal(slotWorldSpace); } }
实例化拖放行为
要在自定义窗口中启用拖放,请在窗口打开时实例化它。
-
在
DragAndDropWindow.cs中,将以下内容添加到CreateGUI()方法中以实例化DragAndDropManipulator类DragAndDropManipulator manipulator = new(rootVisualElement.Q<VisualElement>("object")); 从菜单栏中,选择窗口 > UI 工具包 > 拖放。在打开的自定义编辑器窗口中,您可以将对象拖动到任何插槽中。