配置粒子触发器
首先,指定粒子可以与哪些碰撞器一个用于处理物体物理碰撞的不可见形状。碰撞器不需要与物体的网格完全相同形状 - 粗略的近似通常更有效,并且在游戏玩法中难以区分。 更多信息
查看 词汇表 在场景场景包含游戏环境和菜单。将每个独特的场景文件视为一个独特关卡。在每个场景中,您放置环境、障碍物和装饰,本质上是逐个部分设计和构建您的游戏。 更多信息
查看 词汇表 中进行交互。为此,将一个或多个碰撞器分配到 碰撞器 列表属性中。要增加列表中的碰撞器数量,请单击碰撞器列表下方的添加 (+) 按钮。要从列表中删除碰撞器,请选择该碰撞器,然后单击删除 (-) 按钮。如果您尚未将碰撞器分配到列表的索引,则可以使用更小的添加 (+) 按钮(位于空条目的右侧)来创建和分配新的碰撞器。这将在 粒子系统一个组件,通过在场景中生成和动画化大量小型 2D 图像来模拟液体、云层和火焰等流体实体。 更多信息
查看 词汇表 的子级创建一个新的 游戏对象Unity 场景中的基本对象,可以表示角色、道具、场景、摄像机、路径点等。游戏对象的功用由附加在其上的组件定义。 更多信息
查看 词汇表,并附加一个 球形碰撞器一个球形碰撞器组件,用于处理游戏对象的碰撞,例如球或其他可以粗略地近似为球形的物体(用于物理目的)。 更多信息
查看 词汇表 到它,然后将碰撞器分配到空条目。
添加碰撞器后,您可以指定粒子在满足特定触发器事件类型通过条件时会发生什么。有四种事件类型描述粒子如何与碰撞器交互。它们是
- 内部:粒子在碰撞器边界内。
- 外部:粒子在碰撞器边界外。
- 进入:粒子进入碰撞器边界。
- 退出:粒子退出碰撞器边界。
在 检查器一个 Unity 窗口,显示有关当前选定游戏对象、资源或项目设置的信息,允许您检查和编辑值。 更多信息
查看 词汇表 中,对于每种事件类型都有一个下拉菜单,可以让您选择如果粒子满足触发器事件的条件,应该对其执行什么操作。选项是
- 回调:允许您在 OnParticleTrigger() 回调函数中访问粒子。
- 销毁:销毁粒子。您无法在 OnParticleTrigger() 回调函数中访问粒子。
- 忽略:忽略粒子。您无法在 OnParticleTrigger() 回调函数中访问粒子。
在 OnParticleTrigger() 中访问粒子
如果您选择 回调 作为对其中一个触发器事件的反应,则可以从附加的脚本访问满足事件条件的粒子。为此,您首先需要将 OnParticleTrigger() 函数添加到附加的脚本中。在此函数中,调用 ParticlePhysicsExtensions.GetTriggerParticles() 函数以获取满足触发器事件条件的粒子列表。此函数接受一个 ParticleSystemTriggerEventType,它指定您要获取粒子的触发器事件(内部、外部、进入或 退出),以及一个粒子一个由粒子系统发射的小型简单图像或网格。粒子系统可以显示和移动大量粒子以表示流体或无定形实体。所有粒子的共同效果会产生完整实体的印象,例如烟雾。 更多信息
查看 词汇表 列表,该函数用结果填充列表。从列表中,您可以访问、修改或销毁任何粒子。该函数还可以接受一个可选参数,该参数输出 碰撞当物理引擎检测到两个游戏对象的碰撞器发生接触或重叠时,就会发生碰撞,此时至少有一个游戏对象具有刚体组件并且处于运动状态。 更多信息
查看 词汇表 信息,例如每个粒子触发了哪些碰撞器。碰撞器查询模式 属性控制通过此参数可以获得哪些信息。
有关 API 和如何使用它的更多信息,请参阅 下面的示例。
示例
与碰撞器的交互
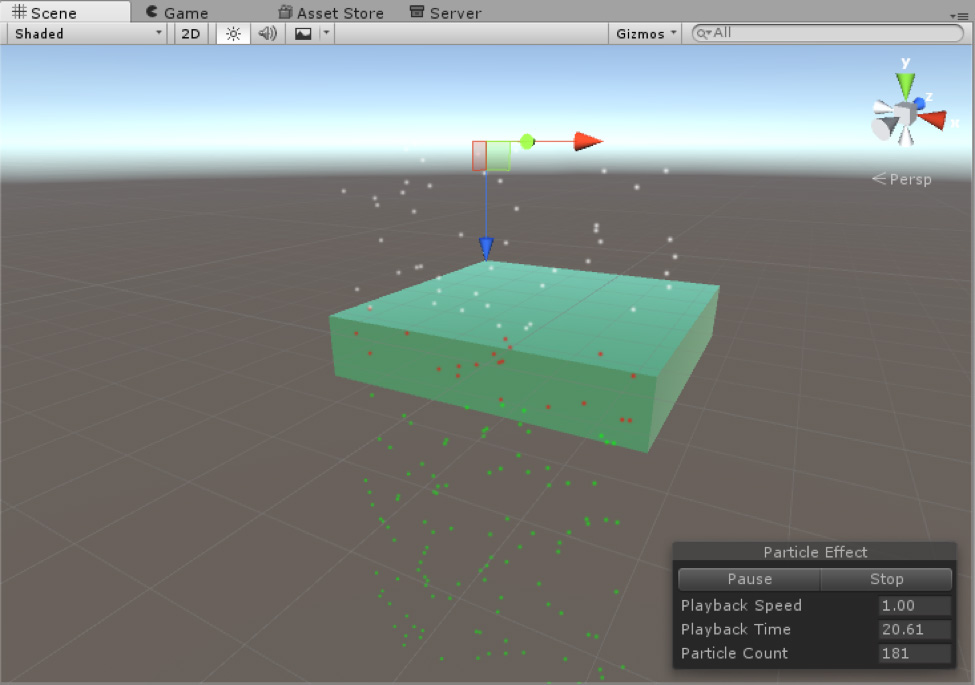
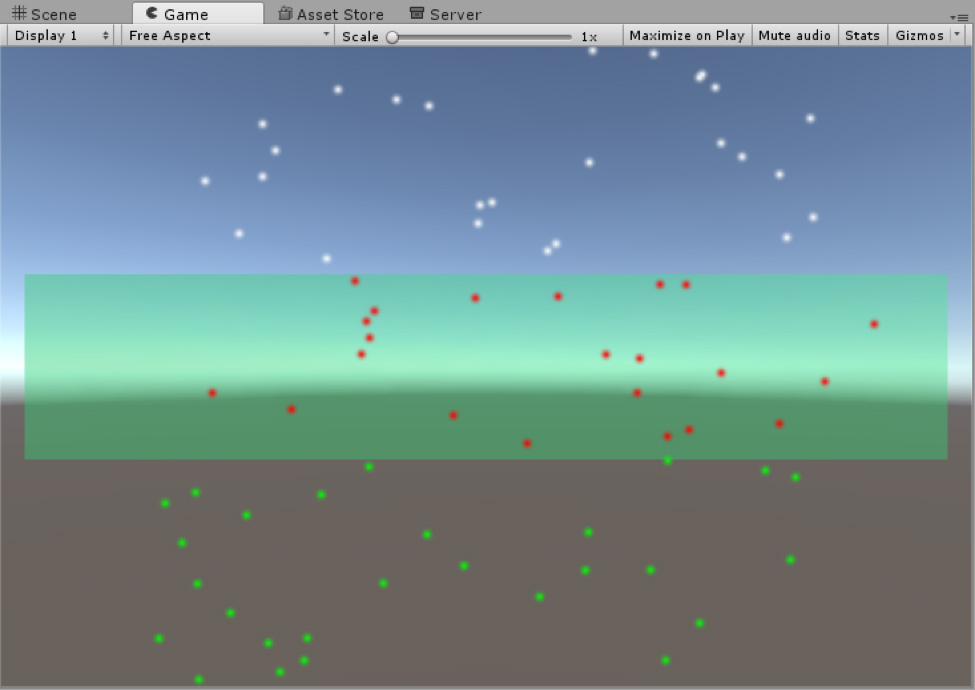
下面的示例会导致粒子在进入碰撞器边界时变为红色,然后在离开碰撞器边界时变为绿色。
using UnityEngine;
using System.Collections;
using System.Collections.Generic;

[ExecuteInEditMode]
public class TriggerScript : MonoBehaviour
{
    ParticleSystem ps;

    // these lists are used to contain the particles which match
    // the trigger conditions each frame.
    List<ParticleSystem.Particle> enter = new List<ParticleSystem.Particle>();
    List<ParticleSystem.Particle> exit = new List<ParticleSystem.Particle>();

    void OnEnable()
    {
        ps = GetComponent<ParticleSystem>();
    }

    void OnParticleTrigger()
    {
        // get the particles which matched the trigger conditions this frame
        int numEnter = ps.GetTriggerParticles(ParticleSystemTriggerEventType.Enter, enter);
        int numExit = ps.GetTriggerParticles(ParticleSystemTriggerEventType.Exit, exit);

        // iterate through the particles which entered the trigger and make them red
        for (int i = 0; i < numEnter; i++)
        {
            ParticleSystem.Particle p = enter[i];
            p.startColor = new Color32(255, 0, 0, 255);
            enter[i] = p;
        }

        // iterate through the particles which exited the trigger and make them green
        for (int i = 0; i < numExit; i++)
        {
            ParticleSystem.Particle p = exit[i];
            p.startColor = new Color32(0, 255, 0, 255);
            exit[i] = p;
        }

        // re-assign the modified particles back into the particle system
        ps.SetTriggerParticles(ParticleSystemTriggerEventType.Enter, enter);
        ps.SetTriggerParticles(ParticleSystemTriggerEventType.Exit, exit);
    }
}
查看下面的图像以了解此示例的结果


与多个碰撞器的交互
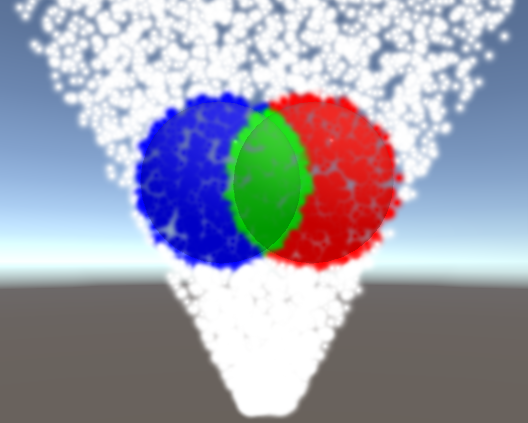
以下示例利用了您可以从 GetTriggerParticles() 函数中提取的额外碰撞数据。它会导致位于第一个碰撞器边界内的粒子变为红色,位于第二个碰撞器边界内的粒子变为蓝色,或同时位于两个碰撞器边界内的粒子变为绿色。如果粒子不在碰撞器内部,它也会将粒子变为白色。对于此示例,碰撞器查询模式 设置为 全部。
using UnityEngine;
using System.Collections;
using System.Collections.Generic;

[ExecuteInEditMode]
public class TriggerScript : MonoBehaviour
{
    void OnParticleTrigger()
    {
        ParticleSystem ps = GetComponent();

        // particles
        List inside = new List();
        List exit = new List();

        // get
        int numInside = ps.GetTriggerParticles(ParticleSystemTriggerEventType.Inside, inside, out var insideData);
        int numExit = ps.GetTriggerParticles(ParticleSystemTriggerEventType.Exit, exit);

        // iterate
        for (int i = 0; i < numInside; i++)
        {
            ParticleSystem.Particle p = inside[i];
            if (insideData.GetColliderCount(i) == 1)
            {
                if (insideData.GetCollider(i, 0) == ps.trigger.GetCollider(0))
                    p.startColor = new Color32(255, 0, 0, 255);
                else
                    p.startColor = new Color32(0, 0, 255, 255);
            }
            else if (insideData.GetColliderCount(i) == 2)
            {
                p.startColor = new Color32(0, 255, 0, 255);
            }
            inside[i] = p;
        }
        for (int i = 0; i < numExit; i++)
        {
            ParticleSystem.Particle p = exit[i];
            p.startColor = new Color32(1, 1, 1, 255);
            exit[i] = p;
        }

        // set
        ps.SetTriggerParticles(ParticleSystemTriggerEventType.Inside, inside);
        ps.SetTriggerParticles(ParticleSystemTriggerEventType.Exit, exit);
    }
}
查看以下图像以了解此示例的结果
